Machine shops around the world that run CNC machine are faced with the fact that their ability to create g-code programs determines the success of their shops. Let’s face it, if you’re prepared to pay the higher cost for a big brand CAD-CAM product then you expect that you are getting the best value for your dollar. But are you?
Read More
CAD-CAM technology is the modern solution to CNC machining automation. Can your machine shop benefit from CAD-CAM? More often than ever before machine shops are using multiple CNC programming systems than ever before. The reason is simple. Not many CAD-CAM products do it all and small to mid-sized machine shops can benefit from having a primary system with a supporting cast of programming solutions in order to meet all of their programming needs. How can BobCAD-CAM fit the bill as your primary CAD-CAM solution?
Read More
BobCAD-CAM has released the new Training Professor Video Series for their v27 2 Axis Lathe CAD-CAM software. Traditionally BobCAD-CAM develops multimedia training videos for all of their CAD-CAM products. With the v27 Mill training video series complete they turned to their Lathe CAD-CAM to provide their users with a complete training solution to learning how to program CNC Lathe parts with their CAD-CAM software.
Read More
CAD-CAM technology is generally used in automating the CNC machining & programming process. CNC Machining is called, “Subtractive Manufacturing”. In recent years emerging technologies in 3D printing has taken the world by storm, blasting open the door to endless “Additive Manufacturing Innovation, not just Rapid Prototyping any more. 3D printers are making things with both plastics and metals now that are providing kids, engineers, inventors and manufacturers the ability to produce amazing products with 3D printing machines.
Read More
CAD-CAM technology will have a big year in 2015 as manufacturing businesses are seeking automation technology as a resource to stay lean, productive and profitable in CNC metalworking. Integrated CAD-CAM software provides solutions that range from 2.5 Axis machine toolpath programming to 3, 4 & 5 Axis 3D CNC programming. CAD-CAM is found in many industries throughout global manufacturing sectors that include Aerospace, Automotive, Defense, Jewelry, Rapid Prototyping and Consumer Product Manufacturing in order to streamline and improve the manufacturing and CNC machine programming process.
Read More
CAD-CAM software is used CNC Machine Shops around the world for its advantages in CNC metalworking, streamlining production and toolpath machining capabilities that keep them lean and profitable. In the past 20 years global economies have seen consumer products manufactured and delivered to market faster and for less than ever before. This is partly due to the explosion in manufacturing automation and CAD-CAM.
Read More
CAD-CAM CNC machine toolpath provides efficient methods of machining parts. The latest BobCAD-CAM V27 MultiAxis Mill Pro software offers many advanced CNC milling capabilities that can also be used for 3 Axis part-making.
Read More
Using CAD-CAM software for 4 Axis CNC machining will give manufacturing an advantage for these types of rotary and indexed parts. Adding a 4th Axis Indexer or Rotary Table to your CNC Vertical VMC or CNC Horizontal mill HMC can also be a huge asset to your shop for many reasons, one of which is increasing your output by reducing setups.
Read More
Do you have BobCAD-CAM in your shop? The new V27 software is a substantial upgrade over earlier versions for some very important reasons. With the release of the new BobCAD V27 CAD CAM software, there are many new CAD Design features that make this release faster, easier and more able to manage drawings and solid models.
Read More
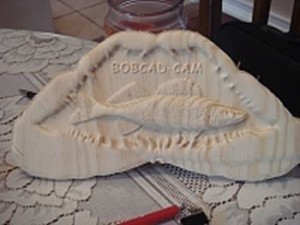
In this example we are going to use a bmp file of a fish to:
• Get the profiles of the fish to use for the embossing process
• Use the image of the fish for texture
During the layout process we are going to use the following features:
• Load Image
• Rectangle
• Change image origin
• Line join
• Ellipse
• Spline fitted
• Deform contour
• Add new layer
• Offset
• Quick trim
• Arc sketch
• Line continuous
Getting Started:
Step 1: Draw a rectangle 11” X 6”
Step 2: Draw a center line
Step 3: Draw an ellipse 9.95” X 5”
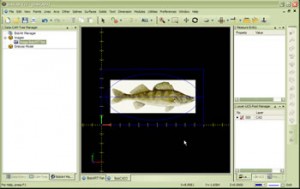
Step 4: Load Fish BMP
Step 5: Change the origin of the image to X: .95” Y: 1.25” Z: 0.0”
 Click here to see video |
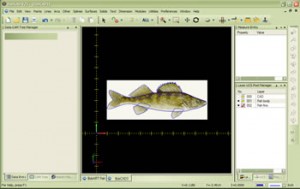
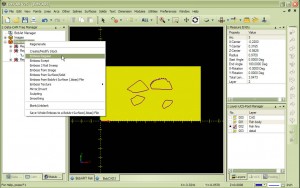
Now we are going to trace the body and fins of the fish:
Step 6: Add a new layer and make it active
Step 7: Use a fit spline to trace around the body of the fish
Step 8: Add a new layer and make it active
Step 9: Use fit spline & line continuous to trace around the fins of the fish.
 Click here to see video |
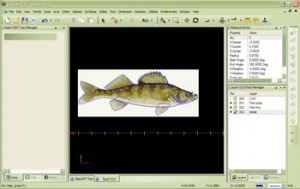
Now we are going to trace the gills and eye of the fish:
Step 10: Create a new layer and make it active
Step 11: Use the fit spline to create the gills
Step 12: Use arc sketch to create the eye
 Click here to see video |
Congratulations you have completed all the wire fame layout for this part!
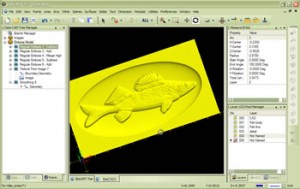
The steps we will be taking now is for the emboss model, we are going to use the wire frame we created to raise and lower areas of our emboss model
Step 1: Create/ Modify stock X:11” Y:6”
Step 2: Emboss convex ellipse subtract the ellipse
Step 3: Emboss convex ellipse add the fish body
Step 4: Emboss convex ellipse merge high the fins
Step 5: Emboss line subtract the gills
Step 6: Emboss convex art the eye
Note: If you see a red X in the BobART manager it means that you have not “regenerated” the emboss model. To do this you RT click on emboss model and LT click on regenerate.
 Click here to see video |
Let’s create our emboss model:
Step 7: Regenerate your emboss model
Step 8: Texture from Image
Step 9: Create a boundary for the image texture
Step 10: Smoothing
 Click here to see video |
|
 |